Let us assume you want to set up alarms at scheduled time which should trigger notifications. Here is how you can achieve it.
You can trigger an alarm at a scheduled time and then use an IntentService to capture it once alarm goes off.
In the main activity (lets assume the name is MainActivity, you can create an alarm like this.
    AlarmManager mgr = (AlarmManager) MainActivity.getSystemService(Context.ALARM_SERVICE);
    Intent intent = new Intent(MainActivity, NotifService.class);
    PendingIntent pi = PendingIntent.getService(MainActivity, 0, intent, 0);
    mgr.set(AlarmManager.ELAPSED_REALTIME_WAKEUP, SystemClock.elapsedRealtime() + PERIOD, pi);
    //where the PERIOD defines after how much milliseconds you want the alarm to go off.
To configure the AlarmManager differently, you can read more about it.
NotifService is what captures the alarm when it goes off. Create a class called NotifService it extends IntentService
public class NotifService extends IntentService {

    public NotifService() {
      super("My service");
    }

    @Override
    protected void onHandleIntent(Intent intent) {
         //write your code for sending Notification
         Intent intent = new Intent();
         intent.setAction("com.xxx.yyy.youractivitytobecalled");
         PendingIntent pendingIntent = PendingIntent.getActivity(getApplicationContext(), 1, intent, 0);
        NotificationCompat.Builder builder = new NotificationCompat.Builder (getApplicationContext());
        builder.setContentTitle("Your Application Title");
        builder.setContentText("Notification Content");
        builder.setContentIntent(pendingIntent);
        builder.setTicker("Your content");
        builder.setSmallIcon(R.drawable.ic_launcher);
        builder.setOngoing(false);
        builder.setPriority(0);

        Notification notification = builder.build();
        NotificationManager notificationManger = (NotificationManager) getSystemService (Context.NOTIFICATION_SERVICE);
        notificationManger.notify(1, notification);

    }
    }
Register NotifService in your AndroidManifest.xml
    <application
             fill content here />

    <service android:name=".NotifService" >
    </service>

    </application>
The menu options in Android which appear as 3 vertical dots on the action bar or any custom bar is a very utility way of providing users with selection choices without being intrusive. Here is a video on all you wanted to know about managing Menu options in Android.
The source code is as follows.
Inside the /res/menu folder, create a file start_menu.xml
In your activity you can put this code to inflate the menu
public boolean onCreateOptionsMenu(Menu menu) {
        // Inflate the menu; this adds items to the action bar if it is present.
        getMenuInflater().inflate(R.menu.start_screen, menu);
        return true;
    }
While creating a new project you would have seen that we need to define the following 3. Here is a detailed explanation of each of them.
Minimum Required SDK - As we know, Android typically does one major release a year. And with every version, Android introduces some new features. Now minimum required SDK defines what is the earliest SDK that you want your application to be compatible with. For example, if you define your Minimum Required SDK as Froyo, then a feature which was introduced in Icecream Sandwich may not work, in which case, you have to handle it specifically how it should behave on a phone which is running on Pre Icecream Sandwich Android Version.
To take a decision on this, please visit the following link to know what percentage of mobile devices are running on which version of Android.
Based on this, you can take a decision what your Minimum Required SDK is. for example, Froyo and Gingerbread combined constitutes only 10.4% of the devices (As of Nov 2014). If you are ok with leaving these devices out, then we can go ahead with Icecream Sandwich as Minimum Required SDK.
Target SDK - This is the highest Android SDK version for which you have tested your app and it is working fine. Mind it, when android releases a new version, it may happen that your application stops working. So you need to retest with every android release and check that your app is working fine.
Compile With - Here you have to define the Android SDK version with which you will compile your app code.
Recently for one of my projects, i was using AsyncTask to fetch data from server using JSON and use the data to populate an arraylist. I wanted to use this arraylist once data fetch is over to render on screen.
To illustrate, I wanted to fetch the list of categories from Server using AsyncTask and then use this list of categories to populate a ListView where each category was a different row in the ListView.
To achieve this, my UI had to wait till the AsyncTask was complete. I read a lot and I got to know that using ProgressDialog is the way to go. So I designed my code like this.
In my Fragment Class, i defined
ListView searchResults;
In OnCreateView, I had the following code.
searchResults = (ListView) myFragmentView.findViewById(R.id.listview_search);

myAsyncTask m= (myAsyncTask) new myAsyncTask().execute(newText);

// The AsyncTask populates the ArrayList arrayCategory with the list of
//categories that we received from the server

searchResults.setAdapter(new SearchResultsAdapter(getActivity(),arrayCategory));
In SearchResultsAdapter, I put the code to populate the ListView with data from arrayCategory.
In myAsyncTask, I initialized a ProgressDialog
I defined
ProgressDialog pd;
in the myAsyncTask.
In onPreExecute
pd= new ProgressDialog(getActivity());
pd.setCancelable(false);
pd.getWindow().setGravity(Gravity.CENTER);
pd.show();
In onPostExecute
pd.dismiss();
This is where I was wrong. ProgressDialog in AsyncTask does stop the UI thread, which means that the users cannot do anything till AyncTask is complete. However, ProgressDialog doesn't stop processing in the thread. So immediately after AsyncTask is called, while doInBackground is running, the system will move on to execute searchResults.setAdapter, even through the ProgressDialog is visible on the screen.
Note, arrayCategory has not yet been populated with data by AsyncTask which is still running, hence searchResults.setAdapter either does not populate all the data, or throws IndexOutOfBound exception.
There are 2 ways to handle this.
1. Using Get statement - This converts the AsyncTask into a Synchronous task. The Get statement waits for the AsyncTask to complete and returns what you want to be returned, like arrayCategory, for example. Through Get, you can return anything from the AsyncTask.
The code for the same would be something like this. In onCreateView, the code should look like this.
searchResults = (ListView) myFragmentView.findViewById(R.id.listview_search);

myAsyncTask m= (myAsyncTask) new myAsyncTask().execute(newText);

// The AsyncTask populates the ArrayList arrayCategory with the list of categories that we

// received from the server

try {

     String temp = m.get();

    } catch (InterruptedException e) {

          // TODO Auto-generated catch block

          e.printStackTrace();

    } catch (ExecutionException e) {

         // TODO Auto-generated catch block

         e.printStackTrace();
   }


searchResults.setAdapter(new SearchResultsAdapter(getActivity(),arrayCategory));
This way, the thread waits and only proceeds once some value is returned. Note: This is not the recommended way of handling this.
2. Calling searchResults.setAdapter from onPostExecute of AsyncTask.
It is recommended, that instead of using Get, we should put what ever we expect to be done after AsyncTask is complete inside doPostExecute. In this case, we should actually put the call the ListAdapter from within doPostExecute. That way, ListAdapter will only be called once doInBackground is complete and hence all data is populated from JSON into arrayCategory.
While using a Spinner Widget in Android, we face a peculiar problem. Lets say that I have a spinner for choosing the City from a list of cities. This is how I want this to look like. However, here likes the problem.
By default Delhi, being the first entry in the ArrayList aa which is the adapter for the spinner, it is shown by the Spinner by default. This is where the problem starts. Since the first entry is shown, the city_spinner.setOnItemSelectedListener identifies this as a selected item. Hence it does not wait for the user to select anything, it simply assumes that Delhi is the choice from user and moves ahead in code.
To bypass this, I tried to keep a counter to identify the first time SetOnItemSelectedListener is called, and handle it to do nothing. My code looks like this.
city_spinner.setOnItemSelectedListener(new OnItemSelectedListener()
{

    @Override
    public void onItemSelected(AdapterView<?> parent, View view, int position, long id)
    {
      if (spinner_count == 0)
      {
         spinner_count++;
      }
      else
      {
         //do what you want to do with the selected field.
      }
    }
});
The spinner_count will be 0 when the first time the activity is rendered, hence as soon as it displays first item (Delhi in this case) by default, it will trigger onItemSelected, but since we have handled it, nothing will happen and the UI will wait for the user to select an Item.
This created another challenge. So when I select Gurgaon or Noida with are the 2nd and 3rd entries, it is working fine. However, if I select Delhi from the dropdown, nothing happens. This is because, since the previous Item Selected by default was Delhi, and I am again trying to select Delhi, it is not getting identified as a new Item selection, hence this portion of the code is not getting called at all. So net net, you cannot select the first entry using this approach.
So I tried a new approach. I added an item "Choose City" in city_list as the first element. Then inside onItemSelected, i specifically handed the case where if 'Choose City' is selected, then do nothing.
The code is as follows.
String[] city_list = new String[4];

city_list[0] = "Choose City";
city_list[1] = "Delhi";
city_list[2] = "Gurgaon";
city_list[3] = "Noida";

ArrayAdapter<String > aa=new ArrayAdapter<String> (getApplicationContext(),
R.layout.spinner_item, city_list);


city_spinner = (Spinner) findViewById(R.id.spinner1);
city_spinner.setAdapter(aa);

city_spinner.setOnItemSelectedListener(new OnItemSelectedListener()

{
     @Override
     public void onItemSelected(AdapterView<?> parent, View view, int position, long id)
     {
         if (parent.getItemAtPosition(position).equals("Choose City"))
         {
             //do nothing.
         }
         else
         {
            // write code on what you want to do with the item selection
         }
     }
});
The output will be as follows as works as expected.
Before we proceed, it is important that we understand the importance and need for custom objects..
The video for the same can be see on youtube
The code for custom object Product.java is as follows. This is to be placed inside com.zing.basket.util (a separate util folder created with /src/ for storing all the util codes)
package com.zing.basket.util;

public class Product{

 private String product_name;
 private String product_code;
 private String product_barcode;
 private String product_department;
 private String product_division;
 private String product_family;
 private String product_groupfamily;
 private String product_subfamily;
 private String product_grammage;
 private String product_mrp;
 private String product_bbprice;
 private String product_qty;
 private String product_value;

 public void setProductName (String product_name)
 {
     this.product_name = product_name;
 }

 public String getProductName()
 {
     return product_name;
 }

 public void setProductGrammage (String product_grammage)
 {
     this.product_grammage = product_grammage;
 }

 public String getProductGrammage()
 {
     return product_grammage;
 }

 public void setProductBarcode (String product_barcode)
 {
     this.product_barcode = product_barcode;
 }

 public String getProductBarcode()
 {
     return product_barcode;
 }

 public void setProductDivision (String product_division)
 {
     this.product_division = product_division;
 }

 public String getProductDivision()
 {
     return product_division;
 }

 public void setProductDepartment (String product_department)
 {
     this.product_department = product_department;
 }

 public String getProductDepartment()
 {
     return product_department;
 }

 public void setProductFamily (String product_family)
 {
     this.product_family = product_family;
 }

 public String getProductFamily()
 {
     return product_family;
 }

 public void setProductGroupFamily (String product_groupfamily)
 {
     this.product_groupfamily = product_groupfamily;
 }

 public String getProductGroupFamily()
 {
     return product_groupfamily;
 }

 public void setProductSubFamily (String product_subfamily)
 {
     this.product_subfamily = product_subfamily;
 }

 public String getProductSubFamily()
 {
     return product_subfamily;
 }

 public void setProductMRP (String product_mrp)
 {
     this.product_mrp = product_mrp;
 }

 public String getProductMRP()
 {
     return product_mrp;
 }

 public void setProductBBPrice (String product_bbprice)
 {
     this.product_bbprice = product_bbprice;
 }

 public String getProductBBPrice()
 {
     return product_bbprice;
 }

 public void setProductQty (String product_qty)
 {
     this.product_qty = product_qty;
 }

 public String getProductQty()
 {
     return product_qty;
 }

 public void setProductValue (String product_value)
 {
     this.product_value = product_value;
 }

 public String getProductValue()
 {
     return product_value;
 }

 public void setProductCode(String product_code)
 {
     this.product_code = product_code;
 }

 public String getProductCode()
 {
     return product_code;
 }
}
In this session, we are going to see how ZBar can be integrated an Android Application. ZBar is one of the most prominent Free Barcode Scanners available.
The following video explains to you step by step on how to implement the same.
Source Code
AndroidManifest.xml
Add the following lines
Add another activity within
Create a new file in src folder called Barcode.java
package com.zing.basket;

import net.sourceforge.zbar.Config;
import net.sourceforge.zbar.Image;
import net.sourceforge.zbar.ImageScanner;
import net.sourceforge.zbar.Symbol;
import net.sourceforge.zbar.SymbolSet;
import android.app.Activity;
import android.content.Intent;
import android.content.pm.ActivityInfo;
import android.hardware.Camera;
import android.hardware.Camera.AutoFocusCallback;
import android.hardware.Camera.PreviewCallback;
import android.hardware.Camera.Size;
import android.os.Bundle;
import android.os.Handler;
import android.widget.FrameLayout;

public class Barcode extends Activity{

 private Camera mCamera;
    private CameraPreview mPreview;
    private Handler autoFocusHandler;

    ImageScanner scanner;
    private boolean barcodeScanned = false;
    private boolean previewing = true;

    public void onCreate(Bundle savedInstanceState)
    {

        setContentView(R.layout.activity_barcode);
        setRequestedOrientation(ActivityInfo.SCREEN_ORIENTATION_PORTRAIT);

        //getActionBar().hide();

        autoFocusHandler = new Handler();
        mCamera = getCameraInstance();
        // Instance barcode scanner
        scanner = new ImageScanner();
        scanner.setConfig(0, Config.X_DENSITY, 400);
        scanner.setConfig(0, Config.Y_DENSITY, 400);
        scanner.setConfig(0, Config.ENABLE, 0);
        scanner.setConfig(Symbol.EAN13, Config.ENABLE,1);
        scanner.setConfig(Symbol.EAN8, Config.ENABLE,1);
        scanner.setConfig(Symbol.UPCA, Config.ENABLE,1);
        scanner.setConfig(Symbol.UPCE, Config.ENABLE,1);

        mPreview = new CameraPreview(this, mCamera, previewCb, autoFocusCB);
        FrameLayout preview = (FrameLayout)findViewById(R.id.cameraPreview);
        preview.addView(mPreview);

        super.onCreate(savedInstanceState);
    }


    /** A safe way to get an instance of the Camera object. */
    public static Camera getCameraInstance()
    {
        Camera c = null;
        try
        {
            c = Camera.open();
        } catch (Exception e)
        {
         //nada
        }
        return c;
    }

    private void releaseCamera()
    {
        if (mCamera != null)
        {
            previewing = false;
            mCamera.setPreviewCallback(null);
            mCamera.release();
            mCamera = null;
        }
    }


    PreviewCallback previewCb = new PreviewCallback()
    {
        public void onPreviewFrame(byte[] data, Camera camera)
        {
            Camera.Parameters parameters = camera.getParameters();
            Size size = parameters.getPreviewSize();
            Image barcode = new Image(size.width, size.height, "Y800");
            barcode.setData(data);
            int result = scanner.scanImage(barcode);
            if (result != 0)
            {
                previewing = false;
                mCamera.setPreviewCallback(null);
                mCamera.stopPreview();
                SymbolSet syms = scanner.getResults();
                for (Symbol sym : syms)
                {
                    barcodeScanned = true;

                    Intent returnIntent = new Intent();
                    returnIntent.putExtra("BARCODE", sym.getData());
                    setResult(1,returnIntent);
                    releaseCamera();
                    finish();
                }
            }
        }
    };

    // Mimic continuous auto-focusing
    AutoFocusCallback autoFocusCB = new AutoFocusCallback()
    {
        public void onAutoFocus(boolean success, Camera camera)
        {
            autoFocusHandler.postDelayed(doAutoFocus, 1000);
        }
    };

    private Runnable doAutoFocus = new Runnable()
    {
        public void run()
        {
            if (previewing)
                mCamera.autoFocus(autoFocusCB);
        }
    };

    public void onPause()
    {
        super.onPause();
        releaseCamera();
    }

    @Override
    public void onBackPressed() {

     releaseCamera();
     Intent intent = new Intent();
        intent.putExtra("BARCODE","NULL");
        setResult(RESULT_OK, intent);
        super.onBackPressed();
    }


}
Create a new file in src folder called CameraPreview.java
package com.zing.basket;

import java.io.IOException;

import android.content.Context;
import android.hardware.Camera;
import android.hardware.Camera.AutoFocusCallback;
import android.hardware.Camera.PreviewCallback;
import android.util.Log;
import android.view.SurfaceHolder;
import android.view.SurfaceView;

public class CameraPreview extends SurfaceView implements SurfaceHolder.Callback
{

    private SurfaceHolder mHolder;
    private Camera mCamera;
    private PreviewCallback previewCallback;
    private AutoFocusCallback autoFocusCallback;


    public CameraPreview(Context context, Camera camera,PreviewCallback previewCb,AutoFocusCallback autoFocusCb)
    {
        super(context);
        mCamera = camera;
        previewCallback = previewCb;
        autoFocusCallback = autoFocusCb;

        // Set camera to continuous focus if supported, otherwise use
        // software auto-focus. Only works for API level >=9.

        // Camera.Parameters parameters = camera.getParameters();
        // for (String f : parameters.getSupportedFocusModes()) {
        //     if (f == Parameters.FOCUS_MODE_CONTINUOUS_PICTURE) {
        //         mCamera.setFocusMode(Parameters.FOCUS_MODE_CONTINUOUS_PICTURE);
        //         autoFocusCallback = null;
        //         break;
        //     }
        // }

        // Install a SurfaceHolder.Callback so we get notified when the
        // underlying surface is created and destroyed.

        mHolder = getHolder();
        mHolder.addCallback(this);

        // deprecated setting, but required on Android versions prior to 3.0
        mHolder.setType(SurfaceHolder.SURFACE_TYPE_PUSH_BUFFERS);
    }

    public void surfaceCreated(SurfaceHolder holder) {
        // The Surface has been created, now tell the camera where to draw the preview.
        try
        {
            mCamera.setPreviewDisplay(holder);
        } catch (IOException e) {
            Log.d("DBG", "Error setting camera preview: " + e.getMessage());
        }
    }

    public void surfaceDestroyed(SurfaceHolder holder)
    {
        // Camera preview released in activity
    }

    public void surfaceChanged(SurfaceHolder holder, int format, int width, int height) {
        /*
         * If your preview can change or rotate, take care of those events here.
         * Make sure to stop the preview before resizing or reformatting it.
         */
        if (mHolder.getSurface() == null){
          // preview surface does not exist
          return;
        }
        // stop preview before making changes
        try {
            mCamera.stopPreview();
        } catch (Exception e){
          // ignore: tried to stop a non-existent preview
        }
        try {
            // Hard code camera surface rotation 90 degs to match Activity view in portrait
            mCamera.setDisplayOrientation(90);

            mCamera.setPreviewDisplay(mHolder);
            mCamera.setPreviewCallback(previewCallback);
            mCamera.startPreview();
            mCamera.autoFocus(autoFocusCallback);
        } catch (Exception e){
            Log.d("DBG", "Error starting camera preview: " + e.getMessage());
        }
    }
}
Make the changes in Search.java.
1. Add 2 methods onActivityResult to receive the scanned barcode back from Barcode Activity
2. buttonBarcode.setOnClickListener to call the Barcode Activity.
package com.zing.basket;

import java.util.ArrayList;

import org.json.JSONArray;
import org.json.JSONObject;

import android.app.ProgressDialog;
import android.content.Context;
import android.content.Intent;
import android.graphics.Typeface;
import android.os.AsyncTask;
import android.os.Bundle;
import android.support.v4.app.Fragment;
import android.view.Gravity;
import android.view.LayoutInflater;
import android.view.View;
import android.view.View.OnClickListener;
import android.view.ViewGroup;
import android.widget.BaseAdapter;
import android.widget.Button;
import android.widget.ImageButton;
import android.widget.ListView;
import android.widget.SearchView;
import android.widget.SearchView.OnQueryTextListener;
import android.widget.TextView;
import android.widget.Toast;

import com.zing.basket.util.Product;


public class Search extends Fragment
{
 View myFragmentView;
 SearchView search;
 ImageButton buttonBarcode;
 ImageButton buttonAudio;
 Typeface type;
 ListView searchResults;
 String found = "N";


 //This arraylist will have data as pulled from server. This will keep cumulating.
 ArrayList<Product> productResults = new ArrayList<Product>();
 //Based on the search string, only filtered products will be moved here from productResults
 ArrayList<Product> filteredProductResults = new ArrayList<Product>();

 @Override
 public void onCreate(Bundle savedInstanceState)
 {
  super.onCreate(savedInstanceState);
 }


 @Override
 public View onCreateView(LayoutInflater inflater, ViewGroup container,
 Bundle savedInstanceState)
 {
  //get the context of the HomeScreen Activity
  final HomeScreen activity = (HomeScreen) getActivity();

  //define a typeface for formatting text fields and listview.

  type= Typeface.createFromAsset(activity.getAssets(),"fonts/book.TTF");
  myFragmentView = inflater.inflate(R.layout.fragment_search, container, false);

  search=(SearchView) myFragmentView.findViewById(R.id.searchView1);
        search.setQueryHint("Start typing to search...");

        search.setIconifiedByDefault(false);

  searchResults = (ListView) myFragmentView.findViewById(R.id.listview_search);
  buttonBarcode = (ImageButton) myFragmentView.findViewById(R.id.imageButton2);
  buttonAudio = (ImageButton) myFragmentView.findViewById(R.id.imageButton1);


  //this part of the code is to handle the situation when user enters any search criteria, how should the
  //application behave?

  buttonBarcode.setOnClickListener(new OnClickListener()
        {
            public void onClick(View v)
            {
             startActivityForResult(new Intent(activity, Barcode.class),1);
            }
        });

  search.setOnQueryTextFocusChangeListener(new View.OnFocusChangeListener()
        {

      @Override
      public void onFocusChange(View v, boolean hasFocus) {
       // TODO Auto-generated method stub

       //Toast.makeText(activity, String.valueOf(hasFocus),Toast.LENGTH_SHORT).show();
      }
     });

  search.setOnQueryTextListener(new OnQueryTextListener()
        {

      @Override
      public boolean onQueryTextSubmit(String query) {
       // TODO Auto-generated method stub

       return false;
      }

      @Override
      public boolean onQueryTextChange(String newText) {

        if (newText.length() > 3)
        {

         searchResults.setVisibility(myFragmentView.VISIBLE);
         myAsyncTask m= (myAsyncTask) new myAsyncTask().execute(newText);
        }
        else
        {

         searchResults.setVisibility(myFragmentView.INVISIBLE);
        }


       return false;
      }

     });
  return myFragmentView;
 }

 //this captures the result from barcode and populates in the searchView.
 @Override
    public void onActivityResult(int requestCode, int resultCode, Intent data)
    {

  //Log.d("arindam","insideOnActivityResult");
  //super.onActivityResult(requestCode, resultCode, data);
        if(requestCode==1)
        {
         String barcode=data.getStringExtra("BARCODE");
         if (barcode.equals("NULL"))
         {
          //that means barcode could not be identified or user pressed the back button
          //do nothing
         }
         else
         {
          search.setQuery(barcode, true);
          search.setIconifiedByDefault(false);
         }
        }

    }

 //this filters products from productResults and copies to filteredProductResults based on search text

 public void filterProductArray(String newText)
 {

  String pName;

  filteredProductResults.clear();
  for (int i = 0; i < productResults.size(); i++)
  {
   pName = productResults.get(i).getProductName().toLowerCase();
   if ( pName.contains(newText.toLowerCase()) ||
     productResults.get(i).getProductBarcode().contains(newText))
   {
    filteredProductResults.add(productResults.get(i));

   }
  }

 }

 //in this myAsyncTask, we are fetching data from server for the search string entered by user.
 class myAsyncTask extends AsyncTask<String, Void, String>
 {
  JSONParser jParser;
  JSONArray productList;
  String url=new String();
  String textSearch;
  ProgressDialog pd;


  @Override
  protected void onPreExecute() {
   super.onPreExecute();
   productList=new JSONArray();
   jParser = new JSONParser();
   pd= new ProgressDialog(getActivity());
   pd.setCancelable(false);
   pd.setMessage("Searching...");
   pd.getWindow().setGravity(Gravity.CENTER);
   pd.show();
  }

  @Override
  protected String doInBackground(String... sText) {

   url="http://lawgo.in/lawgo/products/user/1/search/"+sText[0];
   String returnResult = getProductList(url);
   this.textSearch = sText[0];
   return returnResult;

  }

  public String getProductList(String url)
  {

   Product tempProduct = new Product();
   String matchFound = "N";
   //productResults is an arraylist with all product details for the search criteria
   //productResults.clear();


   try {


    JSONObject json = jParser.getJSONFromUrl(url);

    productList = json.getJSONArray("ProductList");

    //parse date for dateList
    for(int i=0;i<productList.length();i++)
    {
     tempProduct = new Product();

     JSONObject obj=productList.getJSONObject(i);

     tempProduct.setProductCode(obj.getString("ProductCode"));
     tempProduct.setProductName(obj.getString("ProductName"));
     tempProduct.setProductGrammage(obj.getString("ProductGrammage"));
     tempProduct.setProductBarcode(obj.getString("ProductBarcode"));
     tempProduct.setProductDivision(obj.getString("ProductCatCode"));
     tempProduct.setProductDepartment(obj.getString("ProductSubCode"));
     tempProduct.setProductMRP(obj.getString("ProductMRP"));
     tempProduct.setProductBBPrice(obj.getString("ProductBBPrice"));

     //check if this product is already there in productResults, if yes, then don't add it again.
     matchFound = "N";

     for (int j=0; j < productResults.size();j++)
     {

      if (productResults.get(j).getProductCode().equals(tempProduct.getProductCode()))
      {
       matchFound = "Y";
      }
     }

     if (matchFound == "N")
     {
       productResults.add(tempProduct);
     }

    }

    return ("OK");

   } catch (Exception e) {
    e.printStackTrace();
    return ("Exception Caught");
   }
  }

  @Override
  protected void onPostExecute(String result) {

   super.onPostExecute(result);

   if(result.equalsIgnoreCase("Exception Caught"))
   {
    Toast.makeText(getActivity(), "Unable to connect to server,please try later", Toast.LENGTH_LONG).show();

    pd.dismiss();
   }
   else
   {


    //calling this method to filter the search results from productResults and move them to
    //filteredProductResults
    filterProductArray(textSearch);
    searchResults.setAdapter(new SearchResultsAdapter(getActivity(),filteredProductResults));
    pd.dismiss();
   }
  }

 }
}

class SearchResultsAdapter extends BaseAdapter
{
  private LayoutInflater layoutInflater;

  private ArrayList<Product> productDetails=new ArrayList<Product>();
  int count;
  Typeface type;
  Context context;

  //constructor method
 public SearchResultsAdapter(Context context, ArrayList<Product> product_details) {

  layoutInflater = LayoutInflater.from(context);

   this.productDetails=product_details;
   this.count= product_details.size();
   this.context = context;
   type= Typeface.createFromAsset(context.getAssets(),"fonts/book.TTF");

 }

 @Override
 public int getCount() {
  return count;
 }

 @Override
 public Object getItem(int arg0) {
  return productDetails.get(arg0);
 }

 @Override
 public long getItemId(int arg0) {
  return arg0;
 }

 @Override
 public View getView(int position, View convertView, ViewGroup parent)
 {

   ViewHolder holder;
      Product tempProduct = productDetails.get(position);

   if (convertView == null)
      {
       convertView = layoutInflater.inflate(R.layout.listtwo_searchresults, null);
          holder = new ViewHolder();
          holder.product_name = (TextView) convertView.findViewById(R.id.product_name);
          holder.product_mrp = (TextView) convertView.findViewById(R.id.product_mrp);
          holder.product_mrpvalue = (TextView) convertView.findViewById(R.id.product_mrpvalue);
          holder.product_bb = (TextView) convertView.findViewById(R.id.product_bb);
          holder.product_bbvalue = (TextView) convertView.findViewById(R.id.product_bbvalue);
          holder.addToCart = (Button) convertView.findViewById(R.id.add_cart);

    convertView.setTag(holder);
      }
   else
      {
             holder = (ViewHolder) convertView.getTag();
      }


   holder.product_name.setText(tempProduct.getProductName());
   holder.product_name.setTypeface(type);

   holder.product_mrp.setTypeface(type);

   holder.product_mrpvalue.setText(tempProduct.getProductMRP());
   holder.product_mrpvalue.setTypeface(type);

   holder.product_bb.setTypeface(type);

   holder.product_bbvalue.setText(tempProduct.getProductBBPrice());
   holder.product_bbvalue.setTypeface(type);

      return convertView;
 }

  static class ViewHolder
  {
         TextView product_name;
         TextView product_mrp;
         TextView product_mrpvalue;
         TextView product_bb;
         TextView product_bbvalue;
         TextView product_savings;
         TextView product_savingsvalue;
         TextView qty;
         TextView product_value;
         Button addToCart;


  }


}
Download this zip file and place the contents in the /libs folder of your project.
In this step, we are going to see how to integrate the Google's speech recognizer to capture voice and get the text conversion back to your activity.
In this case, the speech recognizer has been used on the Search tab as can be see below. There is a button next to searchView where we are integrating the speech recognizer.
Below is the YouTube video to explain how the integration was done.
2. Add code in onActivityResult to retrieve results and populate the searchView.
@Override
    public void onActivityResult(int requestCode, int resultCode, Intent data)
    {
        //this requestCode is for handling the barcode activity.
        if(requestCode==1)
        {
         String barcode=data.getStringExtra("BARCODE");
         if (barcode.equals("NULL"))
         {
          //that means barcode could not be identified or user pressed the back button
          //do nothing
         }
         else
         {
          search.setQuery(barcode, true);
          search.setIconifiedByDefault(false);
         }
        }

        //this requestCode is for speechRecognizer. Only this part of the code needs to be added for
        //the implementation of voice to text functionality.

        if (requestCode == 2) {
            ArrayList results;
            results = data.getStringArrayListExtra(RecognizerIntent.EXTRA_RESULTS);
            //Toast.makeText(this, results.get(0), Toast.LENGTH_SHORT).show();

            //if the name has an ' then the SQL is failing. Hence replacing them.
            String text = results.get(0).replace("'","");
            search.setQuery(text, true);
         search.setIconifiedByDefault(false);
        }

    }
All of us have faced this challenge where data of one Fragment got changed from another Fragment but since PageViewer instantiates adjacent Fragments even before Fragment is selected, the changed data does not reflect.
Let us take an example. I have a PageViewer with 3 fragments - One is Search, Second is Cart and 3rd is QuickOrder.
By Default, Search is displayed when this activity starts. Since, Cart is next to Search, it is automatically queued up and instantiated. Now, from Search Fragment, if I add an item to cart, since Cart is already instantiated, even when I select Cart, it does not show the newly added item.
When I select Cart, it automatically instantiates QuickOrder Fragment. Now, no matter what I do, since Cart has been already been instantiated, the new data never shows, even if I move between tabs.
I am sure many of you would have faced this problem. So read a lot and saw suggestions from users at StackOverFlow. This is the working solution that I have.
Solution:
Add a hash map to keep the tags of all the Fragments which have been instantiated. This way, from my FragmentActivity, I can check when the Fragment is the current fragment, in which case I call the onResume() method within the Fragment to refresh the content that I want to refresh.
The video should explain it all.
Source Code:
Inside FragmentPageAdapter which is my FragmentPagerAdapter
I define a hash map to store the Tags of the Fragments
mFragmentTags = new HashMap<Integer,String>();
Then we override the instantiateItem method to save the tag of the Fragment in the hashmap along with the position.
    @Override
    public Object instantiateItem(ViewGroup container, int position) {
        Object obj = super.instantiateItem(container, position);
        if (obj instanceof Fragment) {
            // record the fragment tag here.
            Fragment f = (Fragment) obj;
            String tag = f.getTag();
            mFragmentTags.put(position, tag);
        }
        return obj;
    }
Also, we create a method which will return tag of a previously created Fragment based on the position
public Fragment getFragment(int position) {
        String tag = mFragmentTags.get(position);
        if (tag == null)
            return null;
        return mFragmentManager.findFragmentByTag(tag);
}
Inside HomeScreen.java which is my FragmentActivity, inside method on onPageSelected
Fragment fragment = ((FragmentPageAdapter)viewpager.getAdapter()).getFragment(arg0);

	if (arg0 ==1 && fragment != null)
	{
		fragment.onResume();
	}
In myCart.java
@Override
public void onResume()
{
	//do the data changes. In this case, I am refreshing the arrayList cart_list and then calling the listview to refresh.
        getCartData();
        lv1.setAdapter(new custom_list_one(this.getActivity(),cart_list));
}
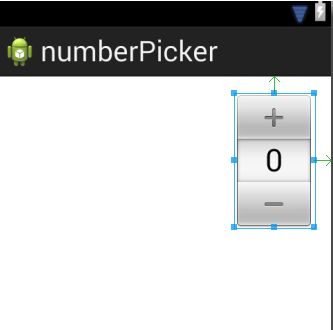
For my E Commerce application that I have been working on, I wanted to use the NumberPicker as it is quite a neat widget. I had to implement in my Shopping Cart where a ListView will be display the items that I have added in the Cart. Within each row of the ListView I had to add a NumberPicker so that the users can change the quantity of the product in the Cart.
So I added the NumberPicker to my layout using the following code.
By default, the size of the NumberPicker is quite big and is completely unusable within a ListView row. So I used the scaling parameters to reduce the size of the NumberPicker.
        android:scaleX=".5"
        android:scaleY=".5"
This would scale the size to 50%. However, this is where the problem starts. As you can see, the scaling happens and the size of the widget becomes smaller. But the padding appears around the widget (as can be seen from the blue rectangle). The problem is, there is no way for us to remove this padding. That is why, even though the widget scales, but it is useless for all practical purposes. Imagine having a ListView whose every row has a width as shown below.
I did a lots of research, but failed. Hence had to revert back to good old 2 buttons and a text box in between. Or if your quantity options are not very big, I would recommend you can even use a Spinner to select the quantity.